AWS S3 Bucket Takeover Vulnerability: Risks, Consequences, and Detection
As the amount of data companies possesses grow, their costs can be optimized more efficiently. Thanks to the emergence of storage technologies, such as AWS S3, that meet business and compliance requirements and their user-friendly nature, companies no longer have to spend a lot of money on purchasing expensive hardware to provide services.
The advent of cloud bucket storage services was a turning point in storage technology.
Over time, companies have become more comfortable using cloud storage services and have started putting all kinds of data into these cloud storage services. Amazon announced in 2021 that it hosted over 100 trillion files on its S3 service. Like any technology, cloud storage services come with security requirements that must be understood.
Cloud service providers use the Shared Responsibility Model. The shared responsibility model of a Cloud Service Provider (CSP) determines how the responsibilities are divided between a CSP and a customer while using a cloud service.
This model explains which aspects of the CSP’s services will be managed by the CSP and which parts will be managed by the customer. For example, the CSP ensures their services’ availability and physical security while the customer performs management tasks such as data protection and updating.
Any problems that arise can lead to issues of liability or responsibility. Therefore, it is essential to understand and determine the duties in the relationship between the CSP and the customer.
Just like you can’t blame the car manufacturer when your car gets stolen because you left the key in the ignition, you can’t blame cloud service providers for problems arising from not taking security measures. Therefore, it is crucial for companies using cloud services to understand the limits and responsibilities in this area and continue their operations accordingly.
Although misconfigurations may seem insignificant initially, they are an excellent “Initial Access” way for attackers. The ID TA0001 in the Mitre Framework represents this step. With the right solution, you can control unauthorized access and incorrect configurations in your cloud services, monitor them regularly, and see a large part of your attack surface, allowing you to take prompt and appropriate action.
What is the AWS S3 Bucket Takeover Vulnerability?
The AWS S3 Bucket Takeover is a powerful attack that targets misconfigured buckets on Amazon’s cloud storage service. This attack allows attackers to access any private storage area belonging to an organization, access the data inside it, and take complete control of the bucket.
Attackers can manipulate the data inside the compromised S3 Buckets, cause data losses that disrupt business processes, and create risky situations such as the theft of sensitive information within the organization.
Threat actors can use compromised AWS S3 Buckets in various malicious activities, such as:
- Conducting phishing attacks by creating fake websites
- Adding malware files to the compromised bucket can lead to supply chain attacks and similar threats
- Redirecting URLs to malicious sites or applications, which can compromise the organization’s virtual environments
How can the AWS S3 Bucket Takeover Vulnerability be Detected and Exploited?
It has been observed that attackers use the following steps to exploit the relevant configuration deficiency:
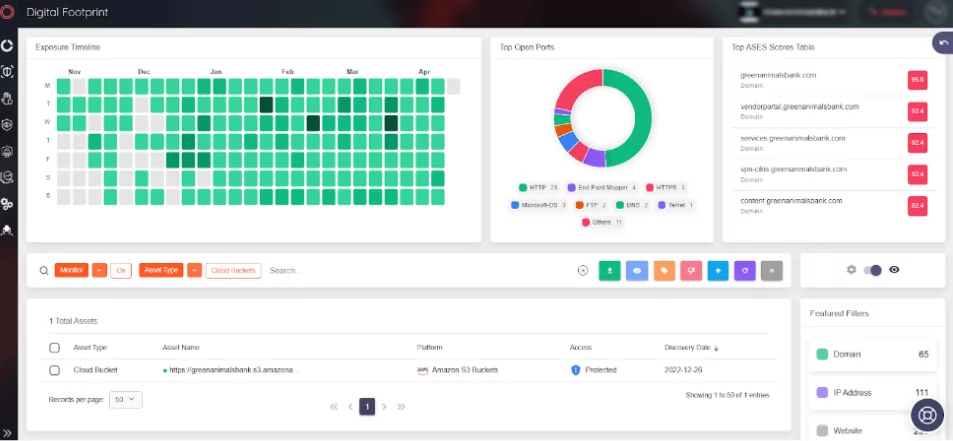
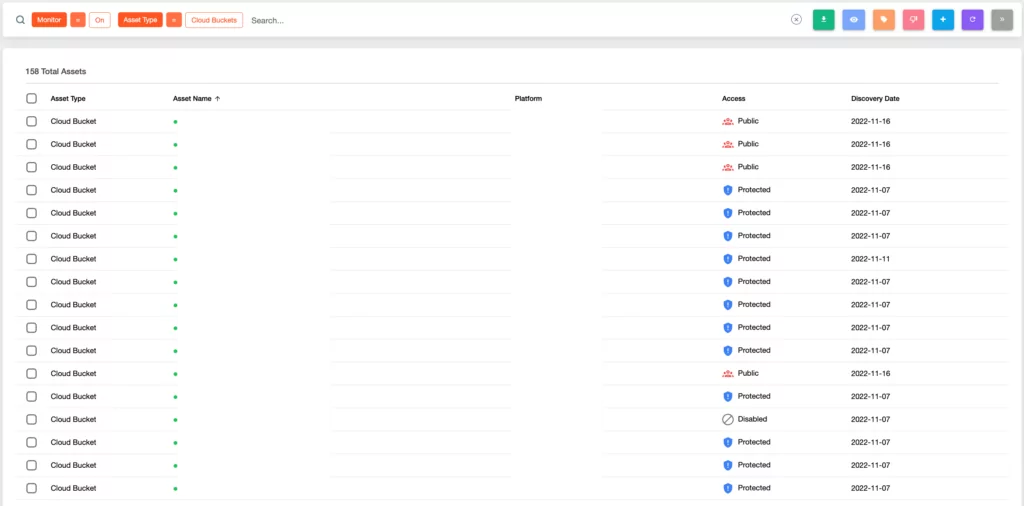
1. AWS S3 Bucket Takeover occurs when an attacker detects a misconfigured S3 Bucket. These buckets lack proper security measures, making them vulnerable to detection by attackers through tools like S3Scanner, and S3Finder. Furthermore, the SOCRadar External Attack Surface Management service can also detect these buckets.
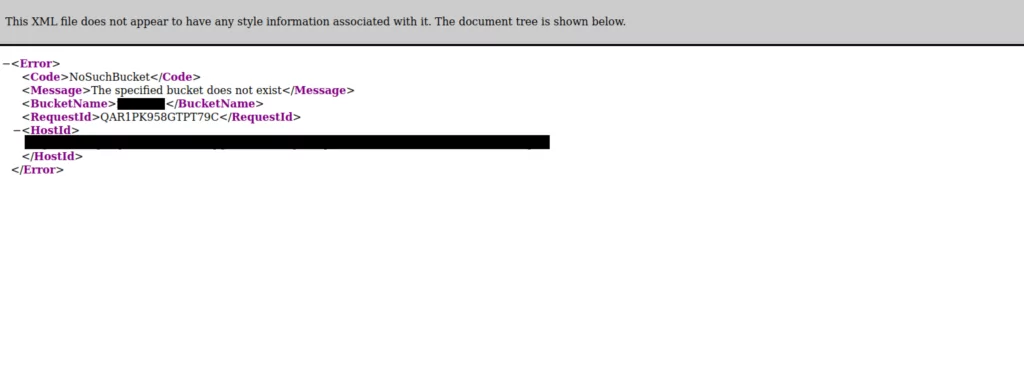
2. When the address of a potentially vulnerable S3 Bucket is visited through a browser and checked, it is observed that no bucket has been created. This situation is sufficient to conclude that the vulnerability can be exploited.
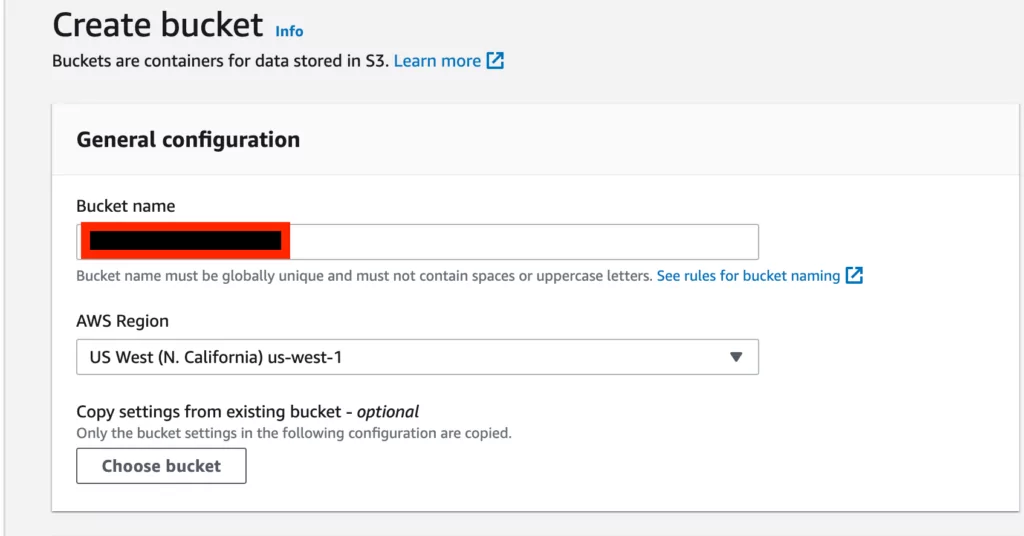
3. To gain control of an address in the S3 settings panel using an AWS account, the initial step is to “Create Bucket,” as shown in the screenshot below. This can be done regardless of the plan or ownership.
4. In the “Create Bucket” screen, the “Bucket Name” parameter in the “General Configuration” column must be entered. Assuming that the vulnerable environment is “test.s3.amazonaws.com“, we only need to enter “test” as the “Bucket Name” parameter.
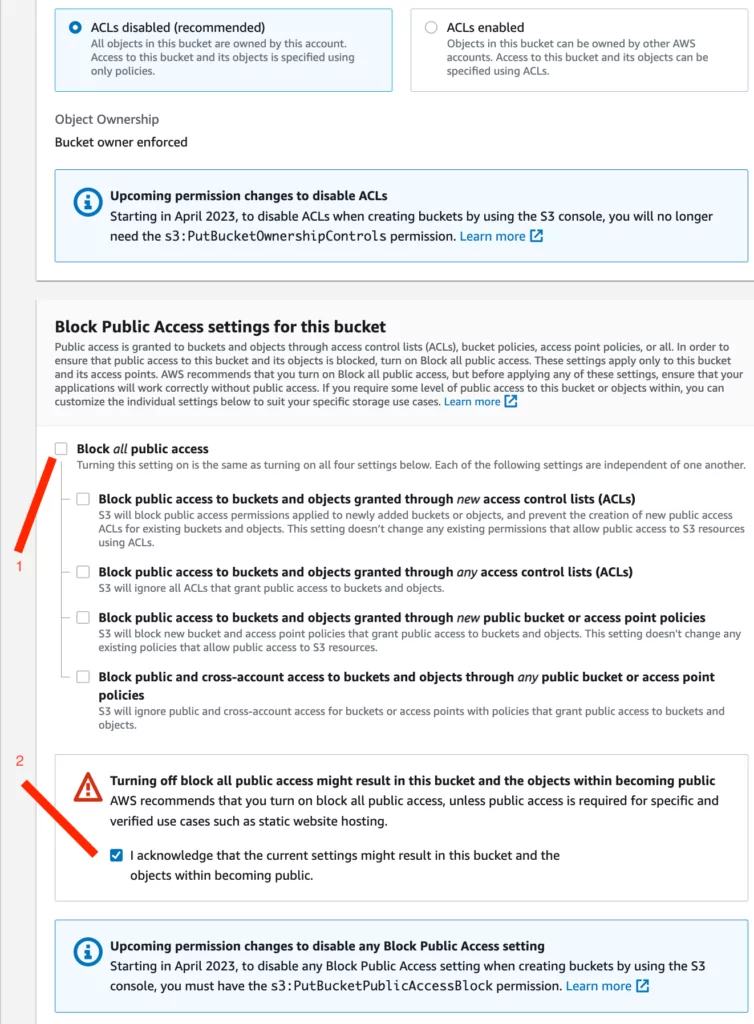
5. In the “Create Bucket” screen, the following options should be selected to allow unrestricted, public access:
- The checkmark shown with the first indicator should be removed.
- The checkbox shown with the second indicator should be selected.
- The other options should remain at their default settings, as shown in the screenshot below.
6. The “KMS Encryption” option is enabled by default. In this configuration, this option should be selected as “Disable.” Afterward, the “Create Bucket” button is clicked to create the vulnerable bucket.
Note: AWS Key Management Service (KMS) provides more secure storage by encrypting data and using services such as S3 on AWS.
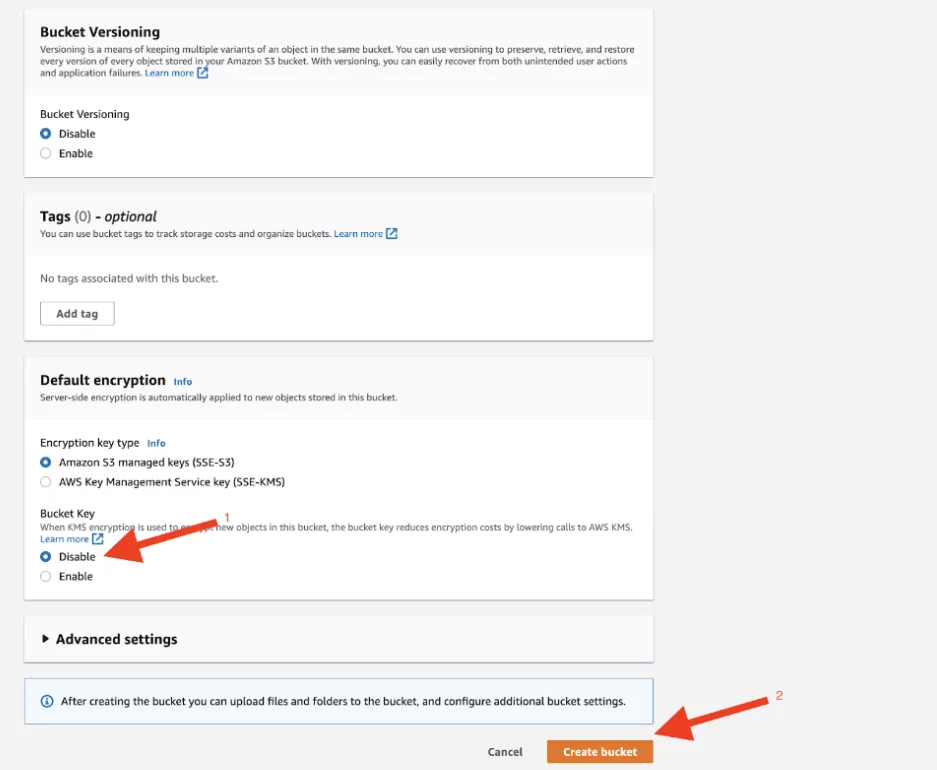
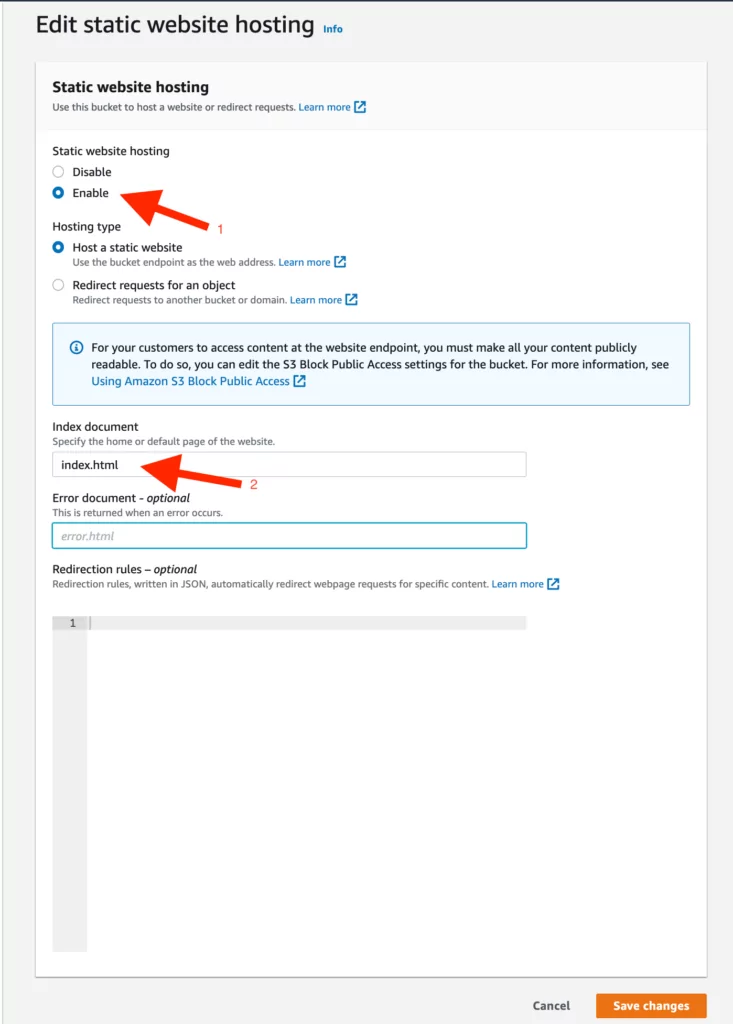
7. After successfully creating the bucket, various permissions and policies will be created to allow us to add the desired data to the bucket. To do this, first, follow the steps of Bucket > “created Bucket” and configure the “Static Web Hosting” option under the “Properties” section by following the steps below:
- In the first step, “Static Web Hosting” should be enabled.
- In the second step, add the file name that will appear on the vulnerable bucket under “index.html,” as demonstrated in the screenshot below.
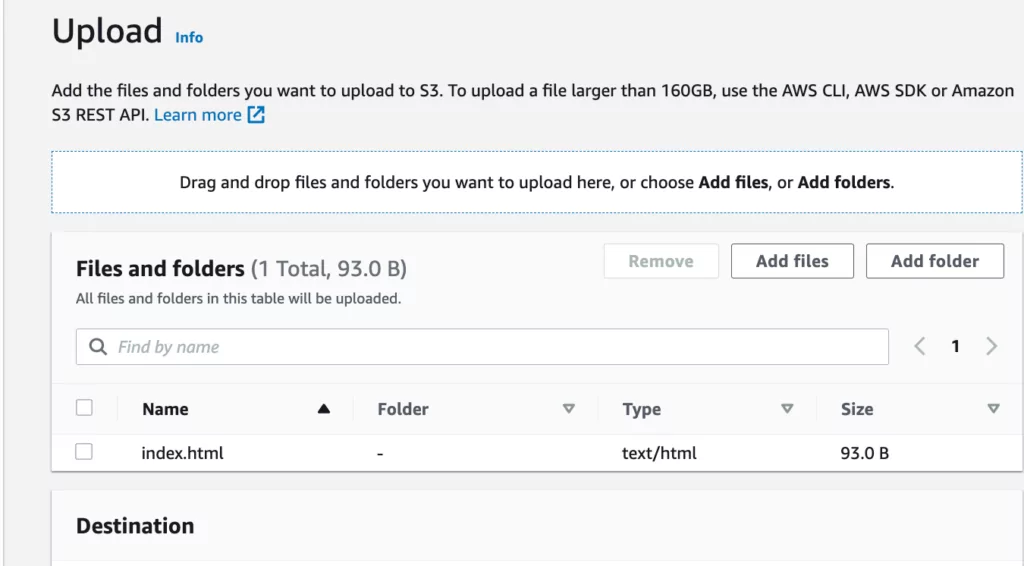
8. In this step, you must add the “index.html” file you want to display in the web interface. You can do this by going to the Buckets > “Bucket Name” tab and selecting the “Objects” option. Then, click the “Upload” button, as shown in the screenshot below, and select the relevant file directory to add the file.

9. After adding the relevant file, the following screen will appear.
10. To view the added data, the policies mentioned in the previous steps need to be edited in the interface under “Buckets”> “Bucket Name”> “Permissions.”
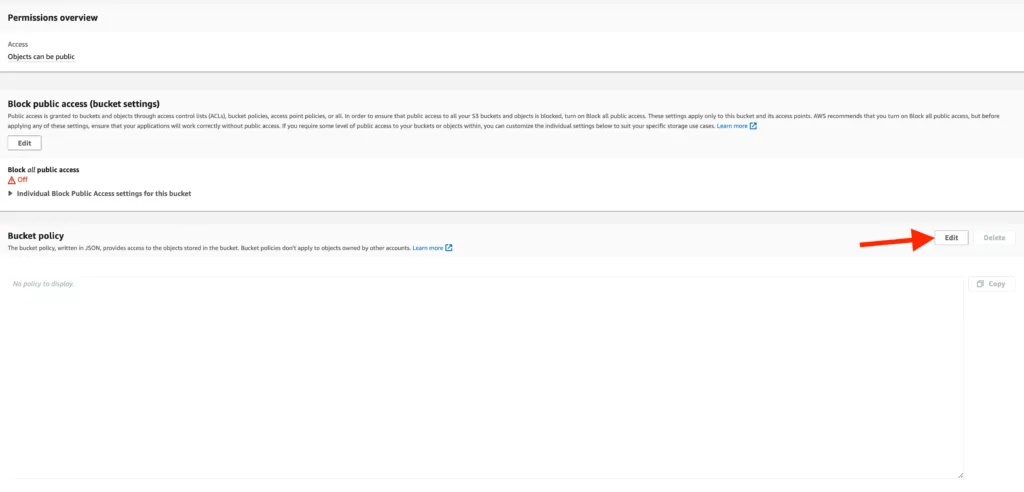
11. When updating the Bucket Policy, the following steps should be followed:
- Copy the Bucket ARN,
- Select the “Policy Generator” AWS offers and perform the necessary configuration steps.
Note: AWS ARN is a unique identifier created by AWS to identify its resources.
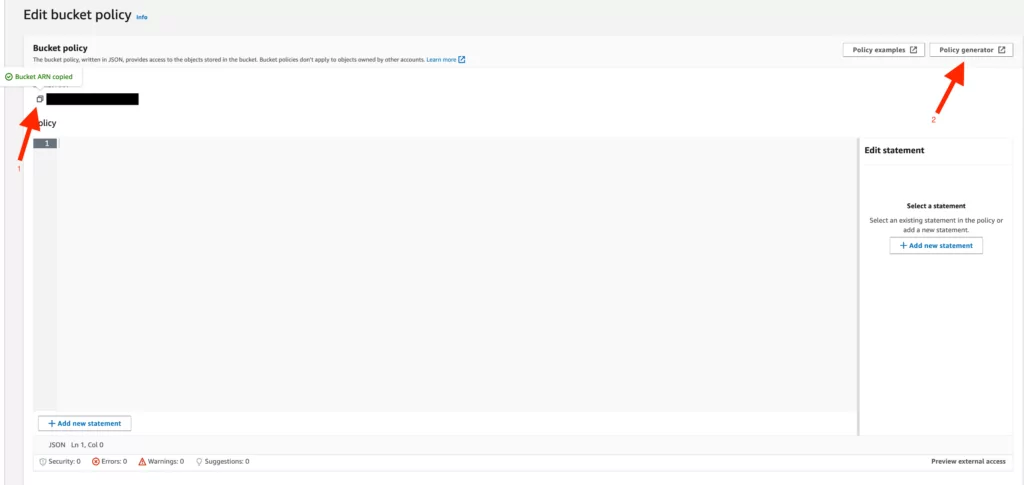
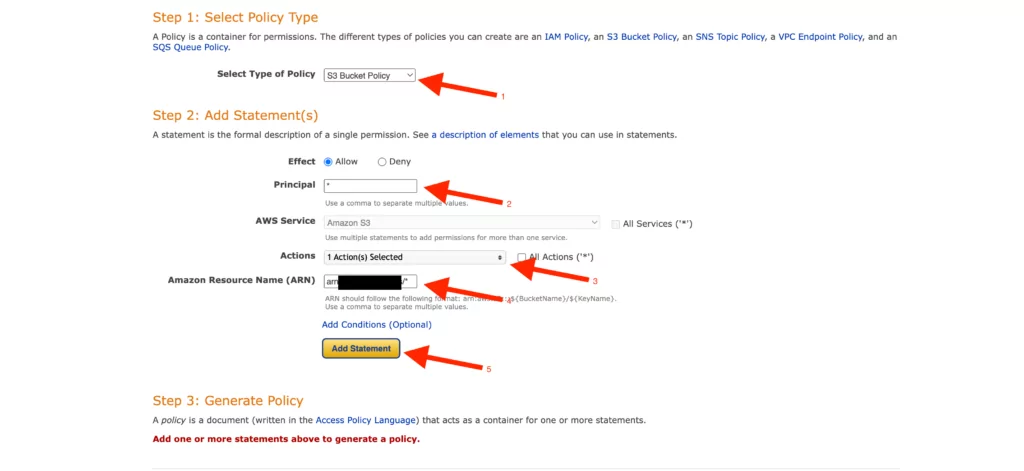
12. To set these policies:
- Select the “S3 Bucket Policy” option,
- Add “*” in the “Principal” option,
- Select the “Get Object” option in the “Action” column,
- Add the unique “ARN” we copied on the “Bucket Policy” page and append “/*” to the end of the added “ARN.”
- Select “Add Statement,” and the relevant policy will appear based on our selected options.
Note: Adding “*” to the “Principal” option allows objects added to the relevant bucket to be displayed publicly.
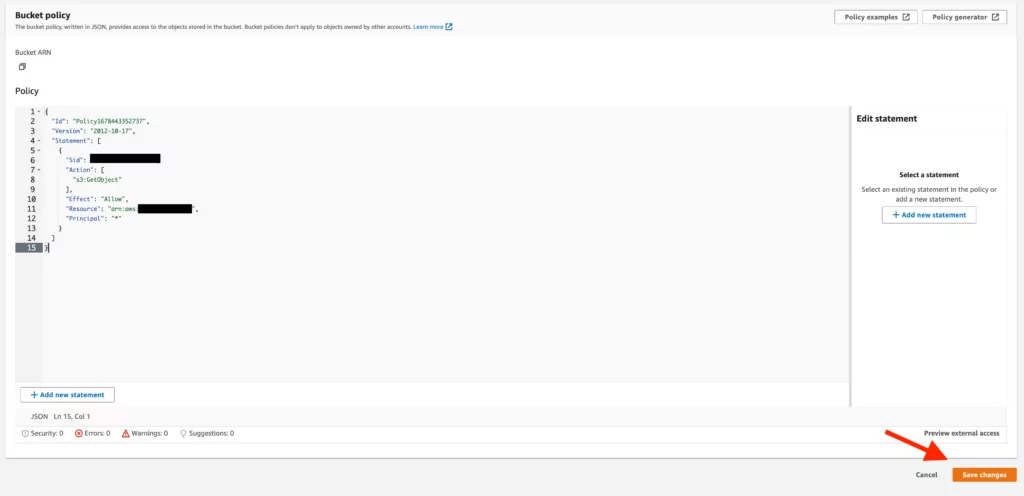
13. The policy created accordingly presents an approach based on the options we determined in the previous step. After adding this policy to the “Bucket Policy” screen, any changes made must be saved.
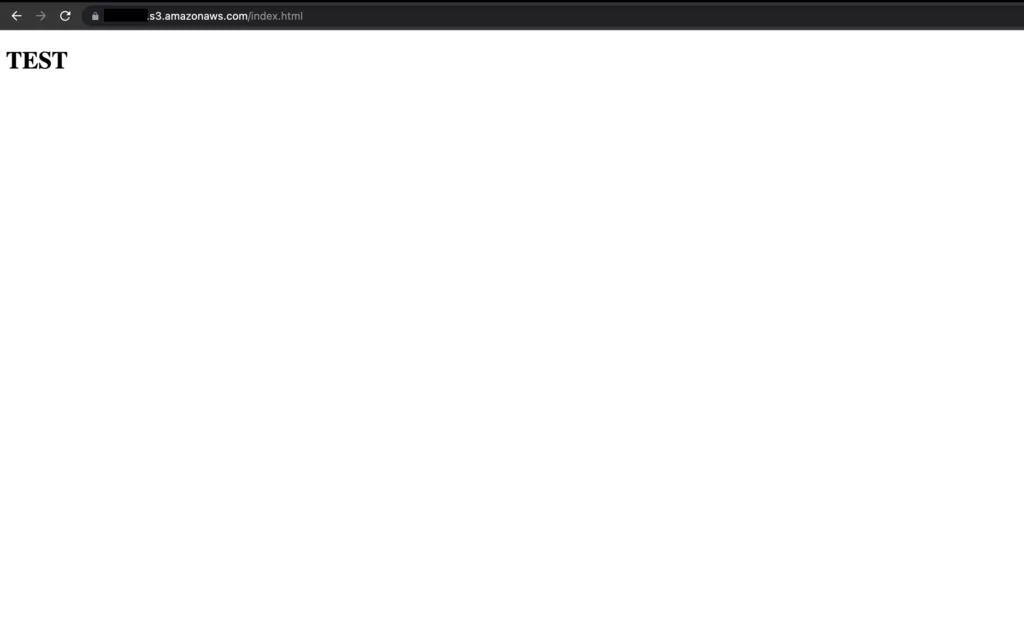
14. Once we’ve made configuration changes, if we visit the address of the bucket we created, we can easily access and view the contents of the added file.
How To Protect: Key Strategies
- The buckets used for storing data within the organization should not be publicly accessible.
- Amazon services such as AWS IAM, Config, CloudTrail, Access Logging, and S3 Bucket Policy should control access to S3 buckets, configure them, and monitor changes made to the buckets to ensure that behaviors on the bucket are affected.
- The data stored in S3 buckets should be encrypted.
- URL redirections should be checked, and these redirections should be restricted or blocked if necessary.
- Deleting the DNS records of unused S3 buckets can prevent potential exploitation.
Also, the Cloud Security Module under the Continuous Pentest within SOCRadar scans the assets on the platform to detect potential AWS S3 bucket takeover vulnerabilities.
